Have you thought about implementing flexible seating in your classroom, but you’re not sure where to begin? You’ve come to the right place! I looked ALL over for a comprehensive guide before starting this with my class and had to piece so many components together. Now that I’ve learned, I can’t wait to share with you this ultimate flexible seating guide! In this post you are going to learn EVERYTHING you need to get flexible seating up and running in your classroom, and have a solid foundation for it to run smoothly for the rest of the year with students. So what are we waiting for?! Let’s dive into ALL things flexible seating!

There are SO many amazing benefits to flexible seating and I applaud you for giving your students this opportunity. Just a few of my favorite benefits are allowing for more choice and flexibility that can ultimately enhance student engagement and learning in the classroom. Believe it or not, flexible seating alleviates SO many behaviors students exhibit because they are better catering to their movement needs and are able get all those wiggles out. Think about it. How many times have you had a student fall out of a seat? Jump up and down in their chair? Sit on their knees? Boys in particular really enjoy flexible seating because they can MOVE. Whether they wiggle on a wiggle stool or simply stand, it makes a HUGE difference for them. Learn more about the why of flexible seating HERE!
Seating Substitutes
First up in the ultimate flexible seating guide is to talk about seating substitutes. You must decide on all the seating options you’ll have available. There are so many awesome seating substitutes out there and chances are, anything different from your normal chairs will be beneficial and comfortable for your students. There is no shame in starting with one or two options the first year! One of my favorite quotes is, “Go slow to go fast.” Whether you want to dive all in or go slow, take your time acquiring different types of seating and do what feels right for you and your students. I have included a list of some of my students’ favorites with links:
- Yoga Balls – I ended up buying the ones with the legs because the other ones rolled everywhere and it drove me crazy.
- Wobble Stools – These are a bit pricey but they hold up well and the kids love them.

- Crate Seats – You’ll find the link to how I made mine. These hold up really well and make for great storage.
- Scoop Rockers – I bought these from Walmart when they were on sale.

- Lap Desks – You can find these at tons of places, such as Target, Walmart, Michael’s, Hobby Lobby, and sometimes dollar stores! I always look for whoever has the cheapest price and/or best coupon.
- Regular Desks are also pretty popular with students. Sometimes they just like to sit in a regular desk and chair! Although, I do like to put these fidget bands on the chair legs for students to still help with the wiggles.
- Standing Desks- These are pretty popular for students who don’t like sitting for long periods of time.
*These are the options that worked best in my classroom. Be open-minded to trying different options and see what works best with you and your students. There are affiliate links included which means I get a small commission if you purchase a seat at no cost to you.

Once you transform your classroom with seating options, another consideration is what to do for nights where parents will be in attendance, especially Meet the Teacher. With flexible seating, this meeting looks MUCH different. Parents aren’t sure where to sit, siblings are playing with yoga balls, and it can get a bit chaotic. To help with this to run smoother, you might want to consider displaying a few seating choices for parents to see that you can speak to, but mostly having chairs for everyone to sit on. Totally your choice!
Flexible Funding
The next component in the ultimate flexible seating guide is funding. Getting enough seats to accommodate all your little learners can get expensive. Lucky for you, I’ve learned some great ways to acquire seats without breaking the bank. Donors Choose is an amazing tool where you can create a project to get funded. This is how I got a lot of my seats. They even have a feature that allows you to pick out options from Amazon so as soon as your project hits its goal, you can get your seats delivered quickly and conveniently. Amazon obviously has tons of options to choose from and many have great reviews. IKEA has many cheap options that kids love, while Hobby Lobby and Michael’s usually have great sales and coupons to use. Don’t forget to also utilize your teacher discount at Hobby Lobby and Michael’s to save even more!
Garage sales are also a great resource for furnishing your room on a budget. You can usually find some seats that you can make your own with a little DIY project. I personally have collected different seating choices over the years to slowly build up our options so the cost didn’t overwhelm me. My best advice is to try and get as much funding as possible and if you have to pay yourself, look for sales and deals to slowly start acquiring seating options over time.
Planning for Success
Once you’ve acquired seating options, it’s time to make a plan to implement starting day one with students. This part of the ultimate flexible seating guide is crucial for your success. The biggest piece of advice I have when teaching students about flexible seating is, model, model, model, and then model some more. The next piece of advice is to organize to a tee because it will help everyone out so much! When deciding to implement flexible seating options in the classroom, organization of all things has to be thought about thoroughly. Below you’ll find some of the guiding questions from my flexible seating checklist and planning guide. These are questions that help you begin to think through and plan out how different a flexible seating classroom looks.
- Will you have individual or classroom supplies? A combination of both?
- Where will students store their materials, books, folders and such?
- Where will you store different seat choices?
- How will students access seats and materials?

With the flexible seating planning guide, I’ll walk you through each step of your plan so that you know exactly how your classroom is going to be set up and organized for students. When I restructured my classroom for flexible seating, I did a combination of individual and classroom supplies. Students used pencil boxes to store their personal materials which also doubled as their Portable Name Plates. This resource also helped them ensure they were able to spell their first and last name. Another huge planning piece with flexible seating is setting up the classroom space FOR students. This can be achieved by labeling ALL the things so they have access to whatever they need, whenever they need it! Sterilite bins are great for housing materials such as scissors, glue, crayons, etc., for students to grab during independent work.


Editable Classroom Supply Labels
Another piece in the ultimate flexible seat guide is storage. Deciding where to store seats is another huge part that should be thoroughly thought through. I knew my plan was to have several spaces that they would live in so that students weren’t all going to the same place all at once. I also knew my plan would probably have issues that I’d have to later work though. It’s okay if you have to change things around multiple times. The way I started the year with flexible seating, is not the way I ended the year. Things change but you and your students adapt and it’s all a learning experience. Below are some different ways flexible seating has been organized and setup in the past.

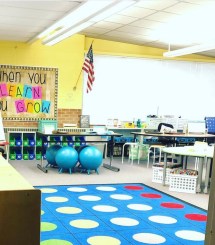


To start the year, I had different table options that would be “The Yoga Ball Table” or “The Wobble Stool Table”. If they wanted those choices, they would have to sit at that table. Other options, like scoop rockers or lap desks, were stored around the room where they could grab and find a spot. The tables later changed so that students could grab a seat and sit wherever they wanted to work. This set up worked for my classroom and my students. You may want things to look different for your students. It’s whatever you feel comfortable with. It’s ok if things don’t work out how you plan….. that’s usually how it goes anyway right? Just learn from the experience and remember that this will push you farther than expected, but so many great things happen because of it. Stick with it and watch the magic happen!
To house remaining student materials such as textbooks, folders, and notebooks, we labeled bins with a number that corresponded to each student. You can grab those labels as a freebie HERE! These bins also became the way students would choose their seat. Students would arrive, grab their bin for the day and place it at the spot they wanted. It was a first come, first serve basis and this is just one way students can choose their seats. We’ll discuss how students choose their seats in the next section!


The biggest mind shift in changing my classroom environment was for the space to be more student centered and to remember this is what helped my students thrive. With the planning guide, you’ll work through all these details so that you feel confident from day one. Of course things will change as you learn and grow with students and that’s okay! Plans are meant to be revised, so remember to document the changes you made for the following year so you won’t forget what worked best!
Put the Ultimate Flexible Seating Guide in Action
Our last piece of the ultimate flexible seating guide is putting it into action! Now that you have your seats, you’ve organized and set up your classroom, you have your materials to teach expectations for all your seating options, we’re ready to go teach right? Oddly enough, this is the moment when I totally panicked. I started wondering, “Where are they going to put all their stuff when they come in?” “Where are they going to sit on the first day of school?” “How in the world am I going to teach them how to use all these seats?!” (Possibly among a million more worries and fears!) This is your support telling you ‘I’m here to help you not panic!’
For the first day of school, I found it most effective to have students bring their backpack and other belongings right to the carpet. After getting to know each other, unloading, collecting and sorting supplies, we began to learn about a few seat choices. It’s best to start slow and introduce a few seats at a time. Starting with the most basic options, such as regular chairs and standing desks, can help students get comfortable and learn expectations. With THESE editable posters, rules, and practice slides, students can learn expectations and practice what it looks and sounds like with a low level task. Students actually really enjoy this time and it eases them into the first few days of school with quick and fun activities like THESE practice sheets. These editable posters are perfect for printing and displaying or presenting digitally and adding your own images!


It’s important to spend the first week of school learning about different seats and practicing how to treat them. With every seat, they always learned the same way. We would sit on the carpet together with our expectations poster and practiced what it looks, what it sounds like, and what it doesn’t. This is the way I teach all expectations to students. Everything is clear and concise when and they walk away knowing exactly how we use these seats. Learn more about teaching routines and procedures HERE!
During our whole group, we discuss seat choices and how to use them effectively. I randomly call on students, ensuring everyone gets a chance to pick a seat first. After choosing, we practice with a simple activity to help students adjust. Once all seats are introduced (usually within a week), I encourage students to try each one and find what helps them work best. We discuss that it’s okay not to like every seat. We create an anchor chart to remind students what a “just right” seat is and isn’t. Some groups may need frequent reminders that choosing seats near friends can be distracting. The expectation is clear: one warning, then I move them. They understand that these seat choices are a privilege that can be taken away if not used correctly. Check out more details on this lesson below!


Choosing Seats and Handling Conflict
In this ultimate flexible seating guide, planning how to handle conflicts is essential. Deciding how students will choose their seats is up to you, and you’ll discover what works best for your classroom. I’ve tried different methods, each with its own benefits. Initially, I used a magnetic board displaying all seating options and their availability. For example, “3 Wobble Seats.” Each student had a magnet with their number, and upon arrival, they’d place it under their chosen seat. Once three magnets were under “Wobble Seats,” others knew that option was full. This method worked well, but the board couldn’t withstand daily use, so I eventually tried something else. Despite that, it’s still a great option for managing seat choices.

When students used the board to pick their seats, the next step in our routine was for them to grab their bin and put it at their spot. I realized I could skip the board altogether and gain some instructional time by simply having students pick their spot with their bin. They would come in the door in the morning and put their bin at the spot they wanted to be at. Other students knew that they could not move that bin or that seat because it was taken. This process took practice and we had to focus on paying attention to other people’s belongings, but in time this became pretty fluid. This also taught them that if they wasted time, they might not get the seat they wanted. After a while, students knew exactly what to do when they came into the classroom every morning.
Of course, even after all of the practicing and all of the modeling, everything will not be perfect. They’re kids! There will be arguing, upset people, and it’s ok. Many days were spent learning how to manage conflict. I really encouraged my students to be understanding and kind with one another. In the beginning of the year, a student might have come in really wanting a yoga ball only to find that they’re all gone. I might ask my students if anyone is willing to give up a yoga ball, especially one who has already had the yoga ball recently. I would facilitate these solutions, but over the year, most of the time students were able to handle this on their own.

Another common scenario is when students aren’t attentive to their classmate’s belongings. They’re encouraged to manage conflicts with kindness. For instance, if Lucy mistakenly places her bin in front of a Wobble Stool already claimed by John, Katie, and Michael, it might lead to an argument. What happens next? Most times, someone simply moves without issue, knowing others would do the same for them. They also understand they’ll get another chance to sit there later in the week. This behavior develops through modeling and praising when students resolve conflicts independently. It’s all about fostering kindness, fairness, and teaching students to manage conflicts on their own—even in first grade!
The biggest take away here is… MODEL, MODEL, MODEL! Be very explicit with your students so they know exactly what it looks like and exactly what it doesn’t look like. Just like with any classroom expectations, be firm and consistent! Flexible seating is a new challenge, but so worth it. Students love being given choices and you will be amazed at what they can do when they’re empowered to do it. I believe if this works with my firsties, this can definitely work with your kiddos! With the flexible seating bundle, I promise feeling completely planned and organized and you’ll walk in the door day one ready to go with your students!
The Ultimate Flexible Seating Guide: Save Yourself The Stress!
If you’re looking for more beginning of the year tips and set up, you’ll love the Back to School Teacher Guide. I go through every detail of setting up a classroom to help you have a smoothly run classroom all year long. Even if you’re a veteran teacher this guide can still help you think about things you may not have before!
I know when I was getting started with flexible seating, I felt so overwhelmed and lost. I had no idea where to start or what to look for. But have no fear! I’ve created this jam packed Flexible Seating Bundle so you don’t have to scramble for resources or put a modge podge of random things together. Instead, you’ll have EVERYTHING you need to begin flexible seating from DAY ONE with students! Included in the bundle you’ll find detailed lesson plans, parent information, editable anchor charts, and SO much more. Check it out HERE!

With flexible seating, it’s a whole new ball game. It’s important to learn how to let some things go. Let go of some of the control, let go of how things look and sound because trust me, it’s going to be different. But if you do let go, wonderful things can happen! Did I know everything diving into this? No. Did things go wrong? Absolutely! But I promise it is well worth it and the difference you see with your students is UNREAL!
I really hope you enjoyed this ultimate flexible seating guide and that you feel good implementing the system in your classroom! Stuck on planning and want help? Please reach out and I’d be more than happy to help you plan through things! Don’t forget to subscribe to my email list! Not only will you get the most up to date tips, tricks, and classroom projects… and of course more fun FREEBIES including the Flexible Seating Setup Checklist FREEBIE! You will also have exclusive access to tons of digital how to videos! If you would like to learn about this and other things happening in my classroom follow me @sweetnsauerfirsties on Instagram.
To follow me on TPT and get all the latest updates on HALF OFF new products, click HERE!

Love these ideas but don’t want to lose them? Don’t forget it, PIN it below!

Leave a Reply